Today we will look at how to build a multi-agent architecture using Microsoft Copilot Studio.
Instead of creating one large agent that knows about every business process, we can create a primary agent that acts as the front door and then delegate work to smaller specialized agents. For example, one agent can handle IT support, another can answer HR questions, and another can deal with travel and expenses.
We will build a simple example from beginning to end and see how Copilot Studio decides which agent should handle a request.
which is based on the newer GitHub Copilot-powered agent model. This experience is
more component-oriented and emphasizes instructions, knowledge, tools, and
connected agents rather than the traditional topic-based authoring model
used in the standard Copilot Studio harness. Because of that, the steps in this
article focus on building a primary agent and connecting specialized agents to it,
rather than using classic Topics or child agents.
What Is a Multi-Agent Architecture?
A multi-agent architecture is an application where several agents work together rather than placing all instructions, knowledge, and tools inside a single agent.
A way to think about this is to imagine a company reception desk.
A user walks up to the reception desk and asks a question. The receptionist does not personally resolve every issue. Instead, the receptionist decides which specialist should handle it.
Our architecture will look like this:
Employee
   |
   v
Primary Agent
   |
   +----> IT Support Agent
   |
   +----> HR Agent
   |
   +----> Travel & Expenses Agent
In Copilot Studio, the primary agent can delegate work to other agents when the user’s request matches their area of responsibility. In the new Copilot Studio experience, we can build multi-agent solutions by connecting specialized agents to a primary agent. Each connected agent can have its own instructions, knowledge, tools, and orchestration.
For this walkthrough, we will use connected agents because we want each specialist to be independently owned and potentially reusable elsewhere.
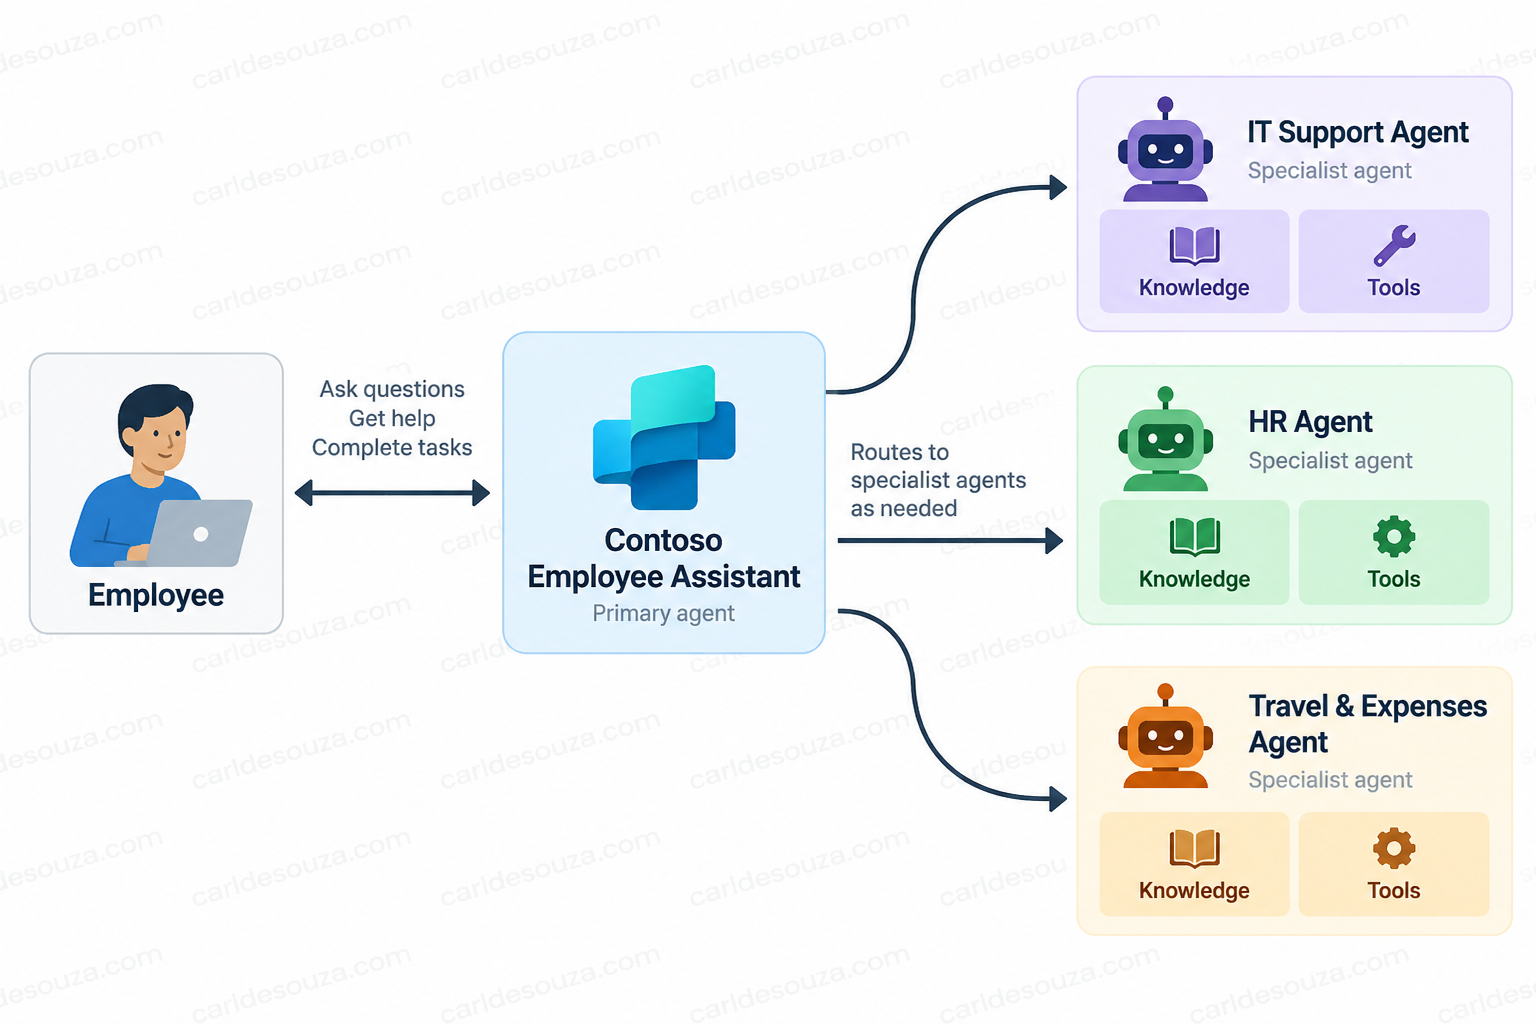
What We Are Going to Build
We will create four agents.
Contoso Employee Assistant
This is our primary agent.
Employees will talk to this agent directly.
Its job is to understand the employee’s request and delegate work to the correct specialist.
IT Support Agent
This agent handles questions such as:
- How do I reset my password?
- My laptop cannot connect to Wi-Fi.
- How do I request Microsoft 365 access?
HR Agent
This agent handles questions such as:
- How many vacation days do I receive?
- What is the parental leave policy?
- Where can I find the employee handbook?
Travel & Expenses Agent
This agent handles questions such as:
- What is the hotel limit when travelling?
- Can I expense a taxi to the airport?
- Where do I submit an expense report?
The important point is that the employee does not need to know that these different agents exist.
They simply talk to the Contoso Employee Assistant.
Why Not Just Build One Large Agent?
We certainly could. For a small solution, keeping everything inside one agent may actually be simpler. However, as the solution grows, we can end up with a large collection of:
- instructions
- knowledge sources
- topics
- tools
- connectors
- business rules
Splitting the solution into specialized agents can make things easier to manage. The IT agent only needs to understand IT requests. The HR team could maintain the HR Agent. The Travel team could maintain the Travel & Expenses Agent. A specialist could also be reused by more than one primary agent.
For example:
Employee Assistant ----+
                       |
Manager Assistant ------+----> HR Agent
                       |
New Hire Assistant -----+
This is one of the situations where connected agents become especially useful. There is a tradeoff, though. Multi-agent solutions can introduce additional orchestration steps, latency, testing requirements, and governance overhead. We should therefore create another agent because it gives us a useful architectural boundary, not simply because using more agents sounds more advanced.
The Architecture
Our solution will look like this:
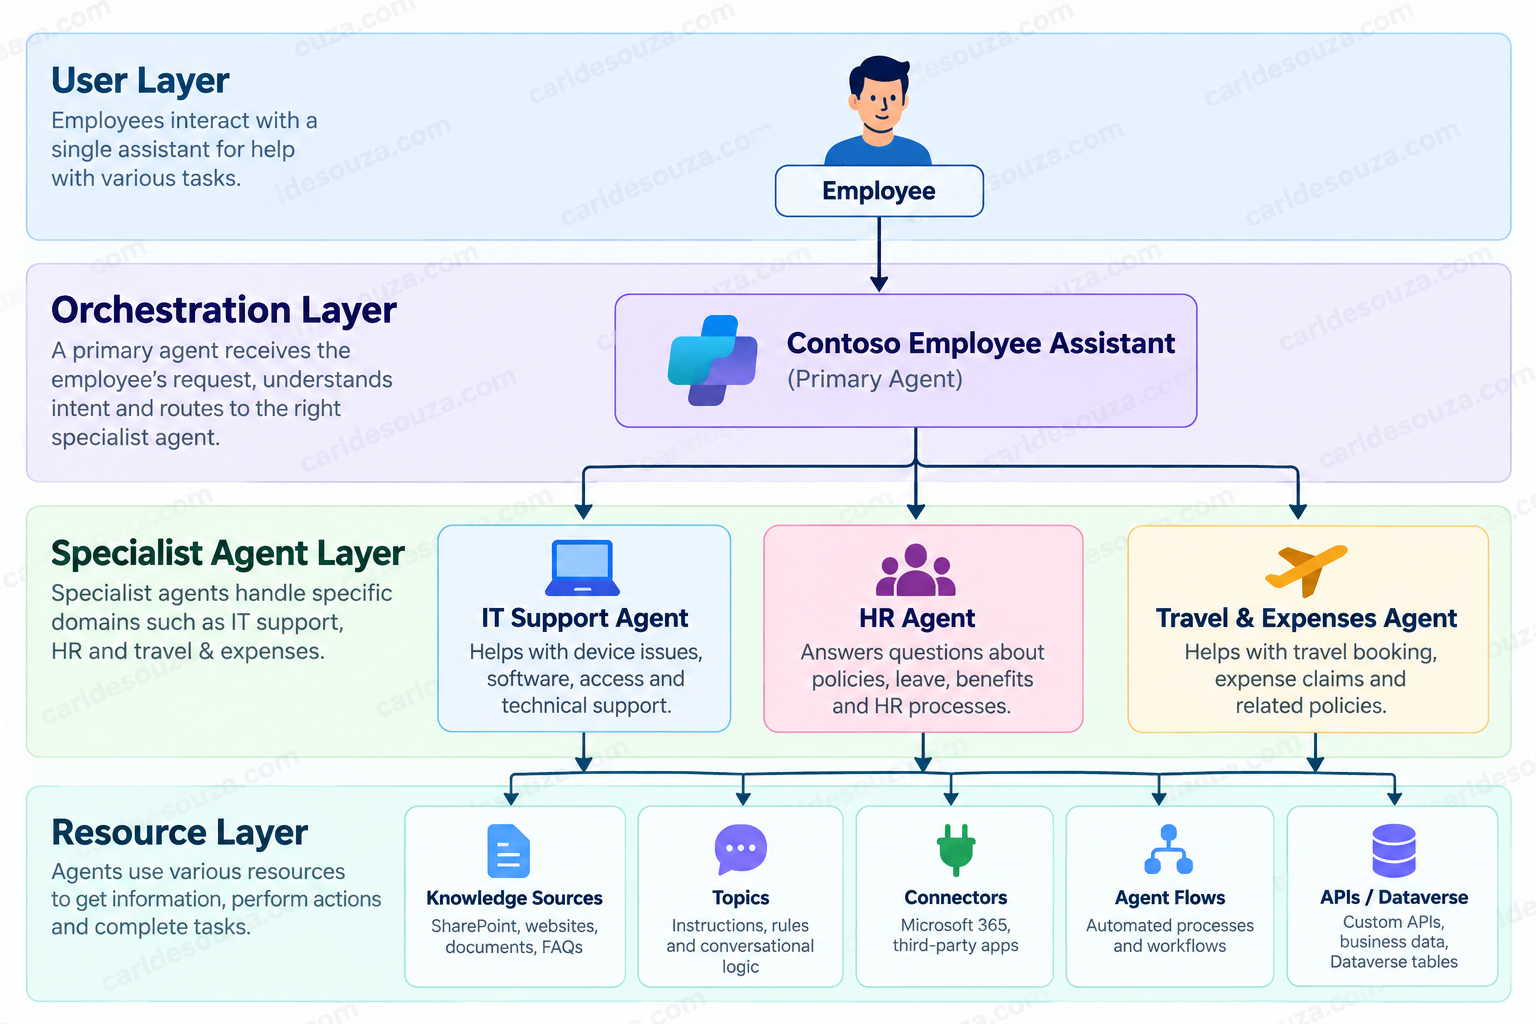
Each specialist agent has its own instructions, knowledge, and tools. The primary agent should not duplicate all of this logic. Its main responsibility is to understand the employee’s request, decide which specialist is appropriate, and coordinate the response.
Prerequisites
Before we begin, we need access to Microsoft Copilot Studio and an environment where we can create and publish agents.
For connected agents, some important points to verify include:
- The connected agent is in the same environment as the primary agent.
- The connected agent is published.
- The connected agent allows connections from other agents.
- The maker of the primary agent has access to the connected agent.
- Authentication and user access have been configured appropriately.
The exact screens may change as Copilot Studio evolves, so we should focus on the architecture and configuration rather than relying on every button staying in exactly the same location.
Step 1: Create the IT Support Agent
Let’s begin with our first specialist.
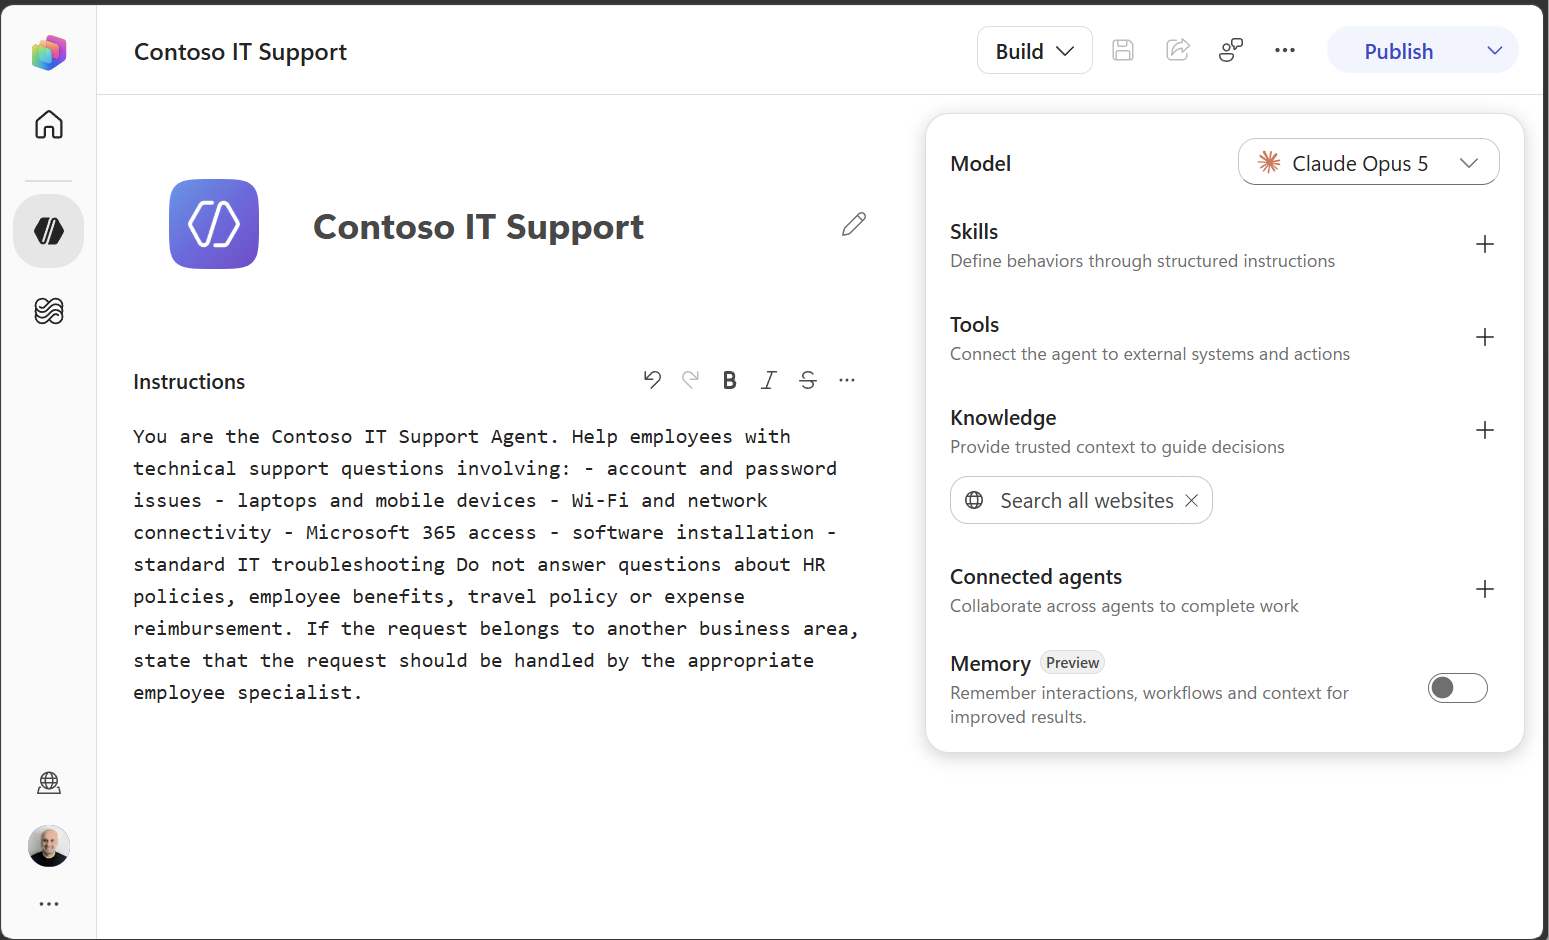
Go to Copilot Studio at https://copilotstudio.microsoft.com. For this walkthrough, we will use the new Copilot Studio experience. Create a new agent named Contoso IT Support and use the Instructions section to define its purpose and boundaries.
We will call ours Contoso IT Support. Use the Instructions section to define its purpose and boundaries. When we later connect this agent to the primary agent, we can provide a specific connected-agent description that helps the orchestrator decide when to use it.
Now add instructions to the IT agent:
You are the Contoso IT Support Agent.

Help employees with technical support questions involving:
- account and password issues
- laptops and mobile devices
- Wi-Fi and network connectivity
- Microsoft 365 access
- software installation
- standard IT troubleshooting

Do not answer questions about HR policies, employee benefits,
travel policy or expense reimbursement.

If the request belongs to another business area, state that the
request should be handled by the appropriate employee specialist.
We are deliberately defining both what the agent should handle and what it should not handle. This helps keep the specialist focused.
Add IT Knowledge
For a real implementation, we might connect knowledge such as:
- SharePoint IT documentation
- internal troubleshooting articles
- device setup instructions
- software request policies
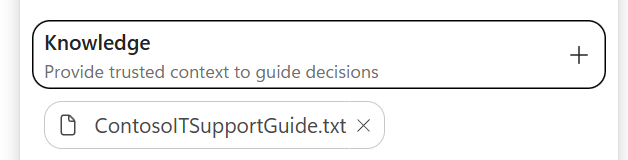
For our walkthrough, we can start with a small test knowledge source. Let’s create a text file called Contoso IT Support Guide and upload it. The file contents:
Contoso IT Support Guide
Password Reset
If an employee forgets their password, they should use the Contoso password reset portal. If self-service reset fails, contact the Service Desk.
Wi-Fi Troubleshooting
If a laptop cannot connect to Wi-Fi:
1. Confirm Wi-Fi is enabled.
2. Disconnect and reconnect to the corporate wireless network.
3. Restart the laptop.
4. If the issue continues, forget the network and reconnect.
5. Contact the Service Desk if the problem persists.
Microsoft 365 Access
Employees who need access to Microsoft 365 applications should submit an access request through the Contoso IT Service Portal.
Software Installation
Standard approved software can be installed through Company Portal. Software that is not listed requires an IT software request.
Upload the file and also remove Search All Websites knowledge:
Save the agent, and we will create our next agent.
Step 2: Create the HR Agent
Next, create another agent named:
Contoso HRThen add instructions:
You are the Contoso HR Agent.

Help employees understand:
- vacation and leave policies
- employee benefits
- parental leave
- employee handbook policies
- general HR procedures

Use the available HR knowledge when answering.

Do not answer IT support, travel booking or expense policy questions.
Let’s create an HR Policy Guide as a text file:
Contoso HR Policy Guide
Vacation Policy
Full-time employees receive 20 days of annual vacation per year.
Carryover Policy
Employees may carry over up to 5 unused vacation days into the next calendar year.
Parental Leave
Eligible employees receive up to 12 weeks of paid parental leave.
Employee Handbook
The employee handbook contains information on workplace conduct, attendance, benefits, and company policies.
Benefits
Benefits information includes medical, dental, vision, and retirement program details.
Attach to Knowledge and also remove Search All Websites:
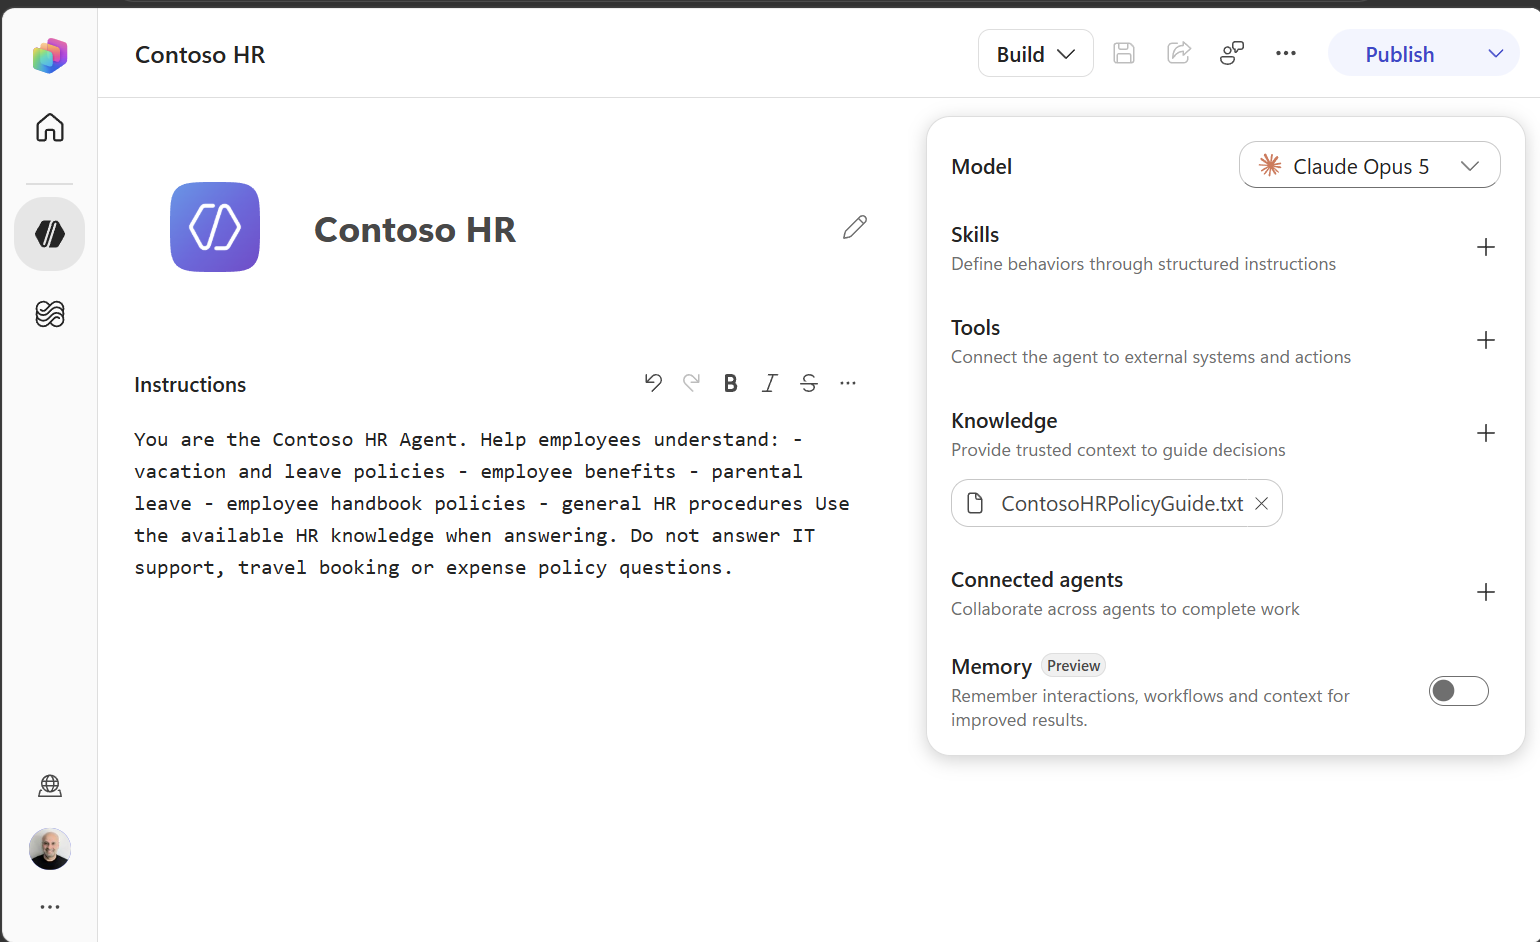
Save the agent.
Step 3: Create the Travel & Expenses Agent
Our third specialist will handle travel and expense questions.
Create:
Contoso Travel and ExpensesInstructions:
You are the Contoso Travel and Expenses Agent.

Help employees with:
- business travel policy
- hotel limits
- meal reimbursement
- ground transportation
- airfare policy
- expense eligibility
- expense report procedures

Use the available travel and expense policy as the authoritative
source when answering.

Do not answer IT support or HR policy questions.
Travel Policy text file:
Contoso Travel and Expense Policy
Airfare
Employees should book economy-class airfare for domestic and international business travel. Premium cabin travel requires manager approval.
Hotels
Employees may book hotels up to $250 per night before taxes and fees. If no suitable hotel is available within the limit, manager approval is required.
Meals
Employees may expense up to $75 per day for meals while travelling on company business.
Ground Transportation
Reasonable taxi, rideshare, public transportation, and rental-car expenses may be reimbursed when required for business travel.
Airport Parking
Airport parking is reimbursable for business trips. Employees should use economy or long-term parking where practical.
Expense Reports
Expense reports should be submitted within 10 business days after returning from a trip.
Receipts
Receipts are required for individual expenses of $25 or more.
Save the agent:
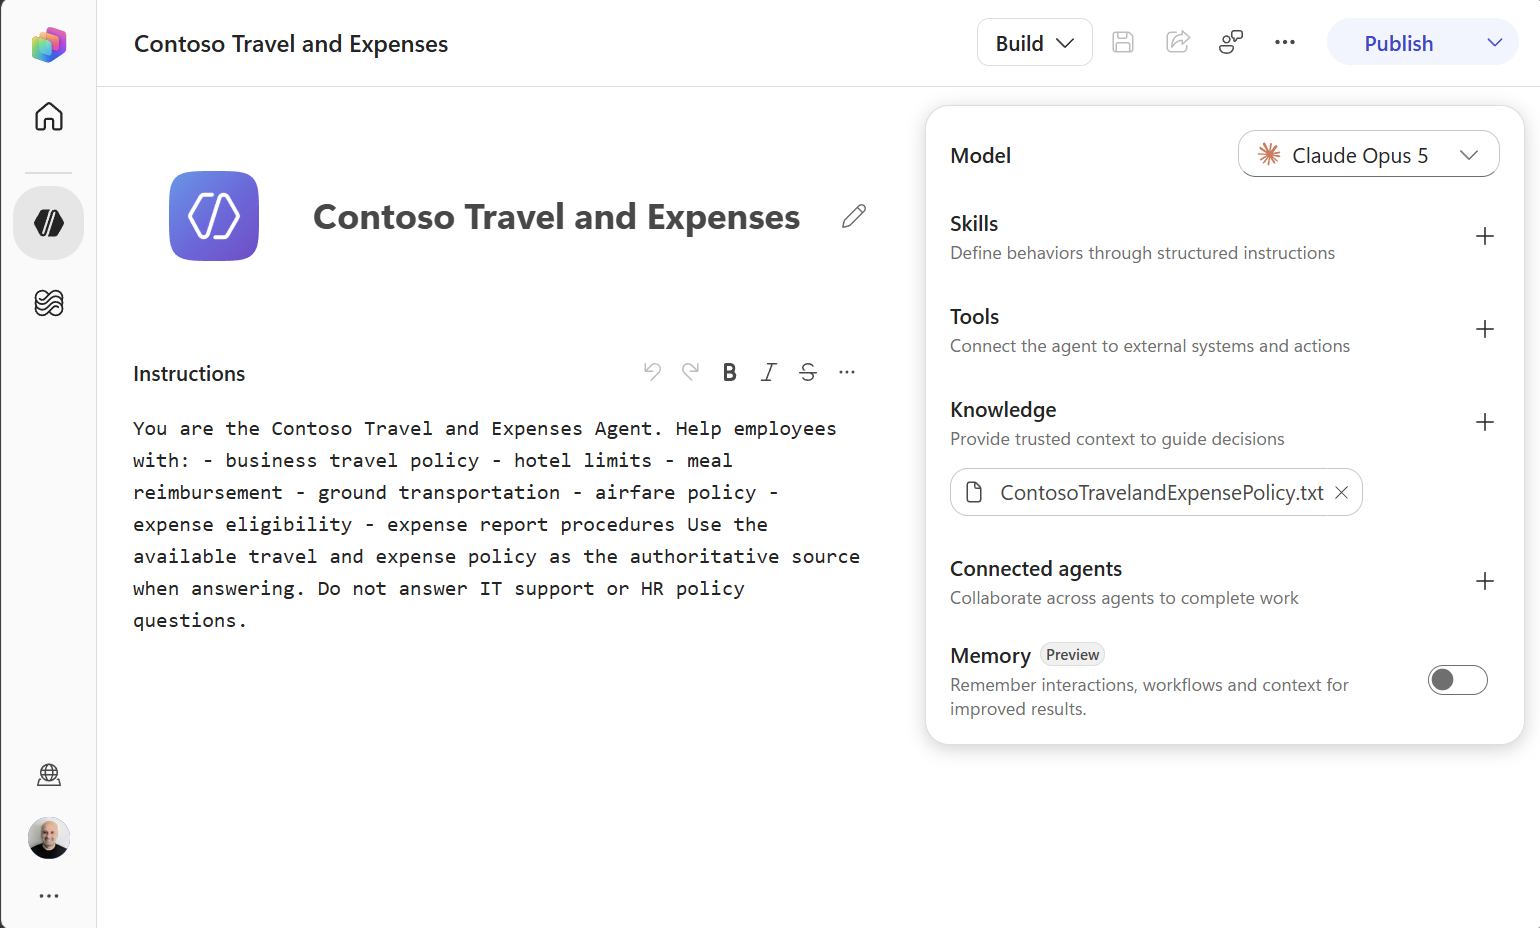
Step 4: Test Each Specialist Before Connecting Them
Before connecting anything, test the agents independently. Go to the Preview tab for each agent.

For the IT Support Agent, try:
My laptop cannot connect to Wi-Fi. What should I try?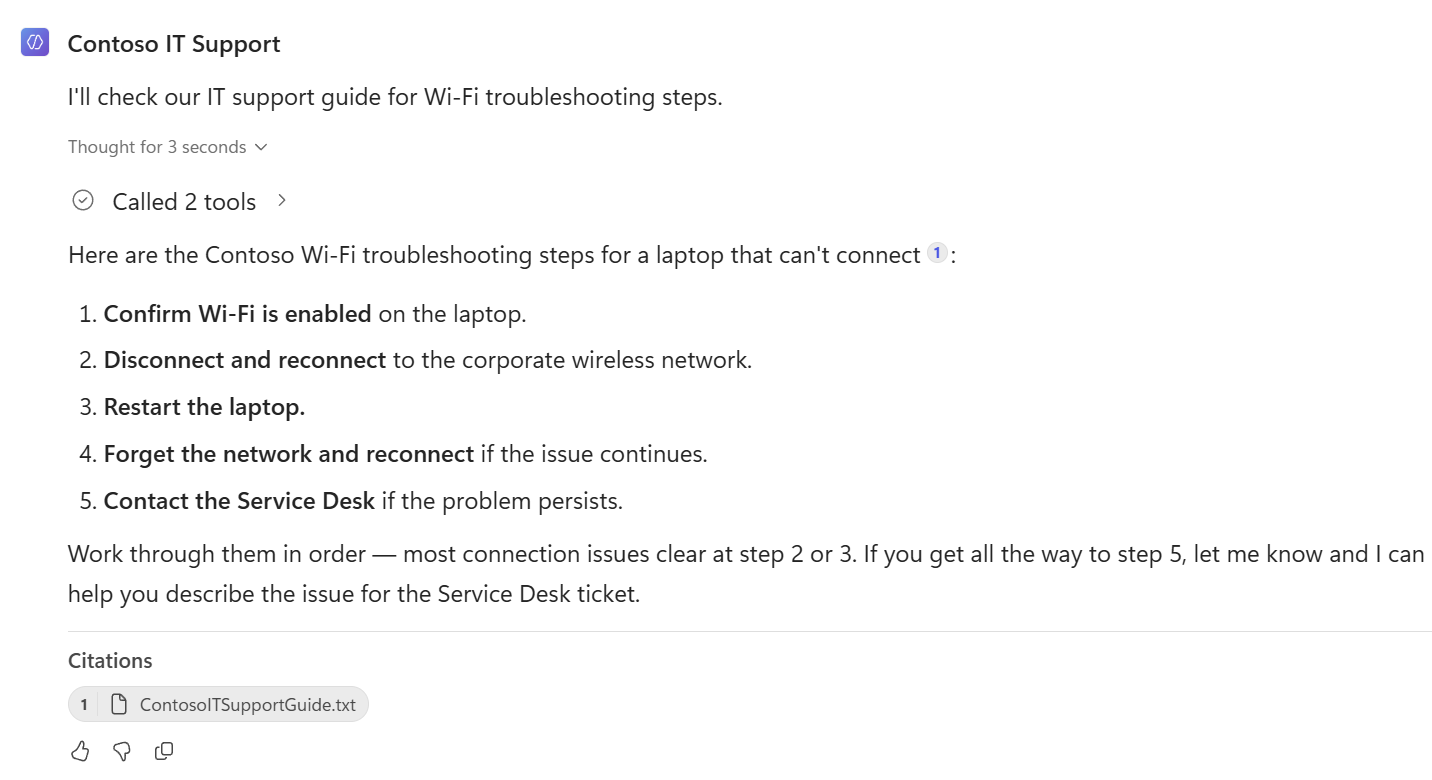
For the HR Agent:
What is our parental leave policy?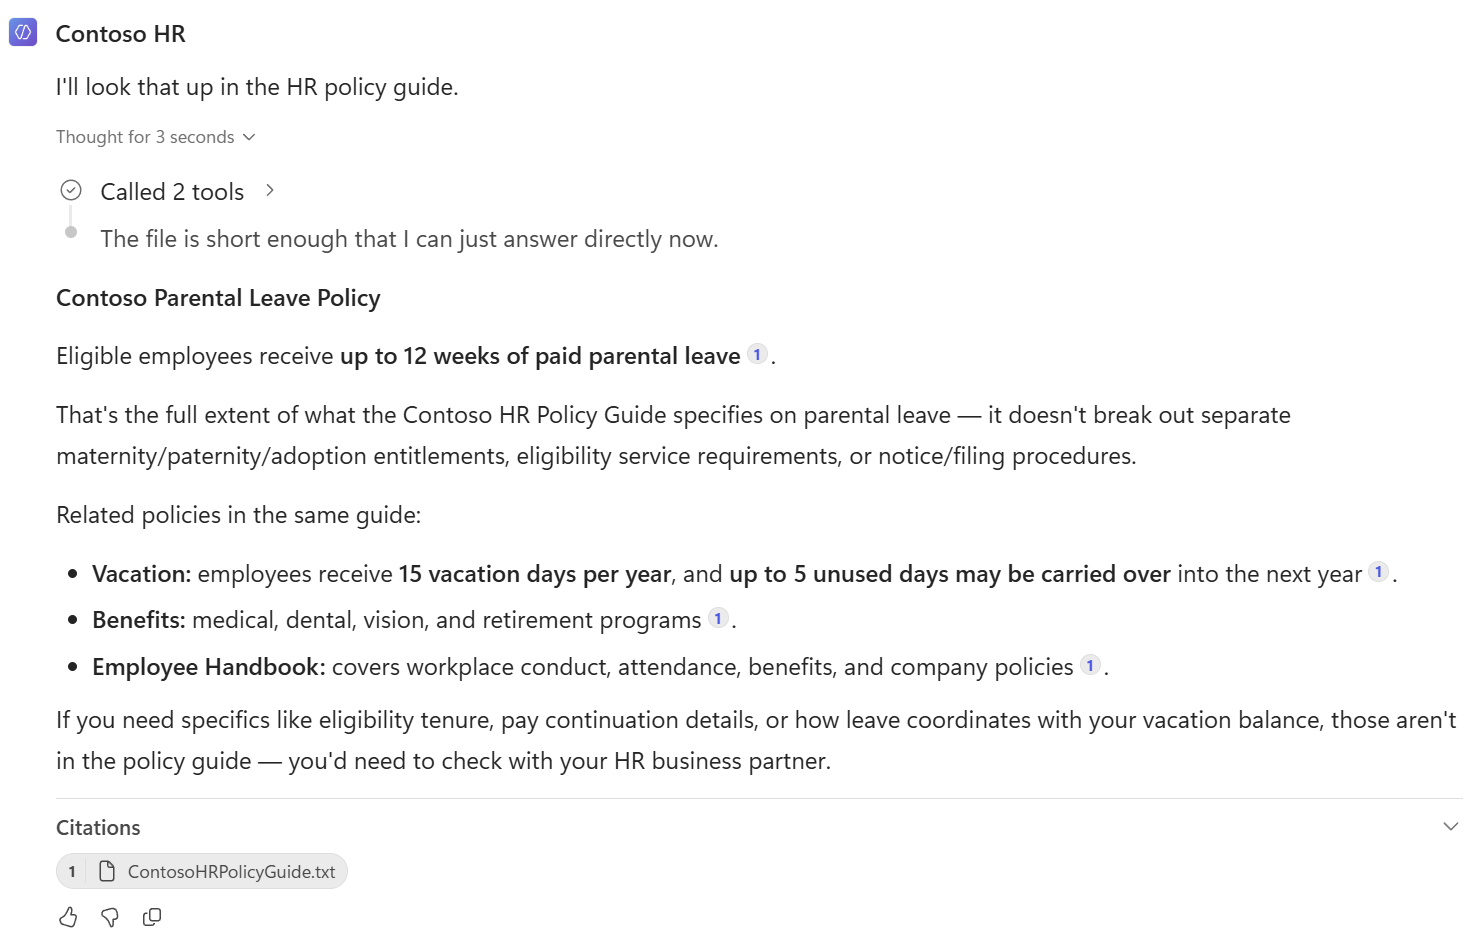
For the Travel & Expenses Agent:
Can I expense a taxi from the airport to the hotel?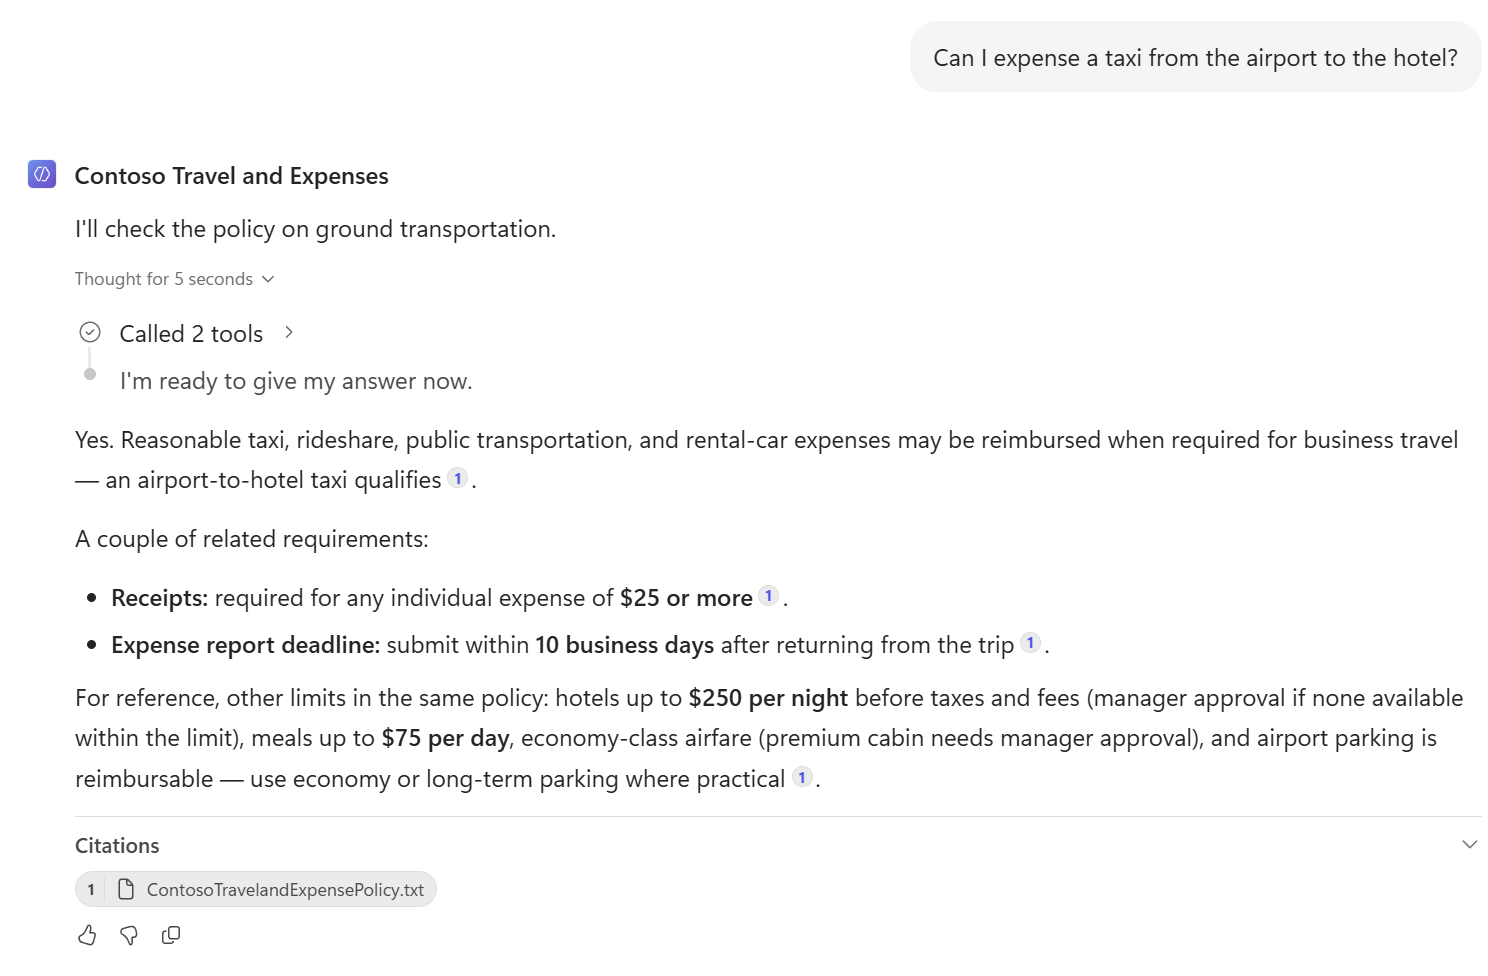
This gives us a useful debugging technique later. If a specialist cannot correctly answer a question when tested by itself, connecting it to a primary agent will not solve that problem.
We should get the specialist working first and then test the delegation layer.
Step 5: Publish the Specialist Agents
Verify that each agent is configured so that other agents can connect to it. For each agent, go to Agent Settings and ensure “Allow other agents to connect” is on:
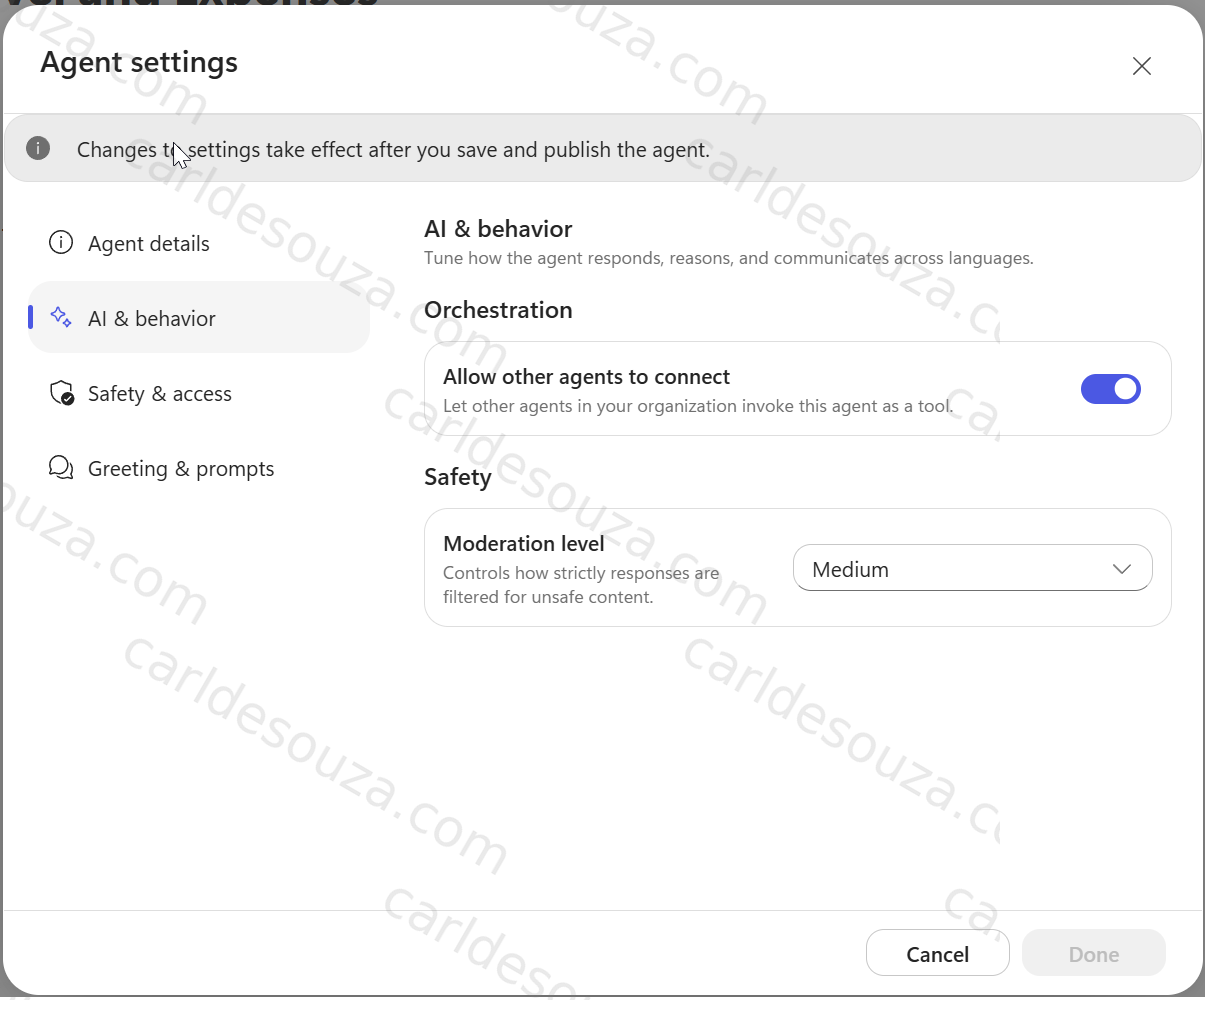
Connected Copilot Studio agents need to be published before they can be used by another agent. Publish each of our three specialists:
Contoso IT Support
Contoso HR
Contoso Travel and Expenses
Step 6: Create the Primary Agent
Now create our front-door agent:
Contoso Employee AssistantIts role is different from the specialists. It should coordinate rather than contain all of the specialist business logic. We can use instructions similar to the following:
You are the Contoso Employee Assistant.

You are the primary assistant for Contoso employees.

Use the available specialist agents when a request falls within
their area of responsibility.

Use the IT Support specialist for technical support, accounts,
devices, networking, Microsoft 365 access and software issues.

Use the HR specialist for leave, benefits, employee policies
and employee handbook questions.

Use the Travel and Expenses specialist for business travel,
reimbursements, hotel limits, meals, transportation and
expense-report questions.

If a request contains multiple independent tasks, use the
appropriate specialists for each task where possible.

Do not invent company policy. Use the appropriate specialist
and its available knowledge.

If the employee's request is ambiguous, ask a short clarifying
question rather than guessing which policy or process they mean.
This is our orchestration layer.
Notice that we have not copied the HR handbook into the primary agent or recreated the IT troubleshooting process here. The specialist agents own those areas.
Remove Search all Websites, and Save.
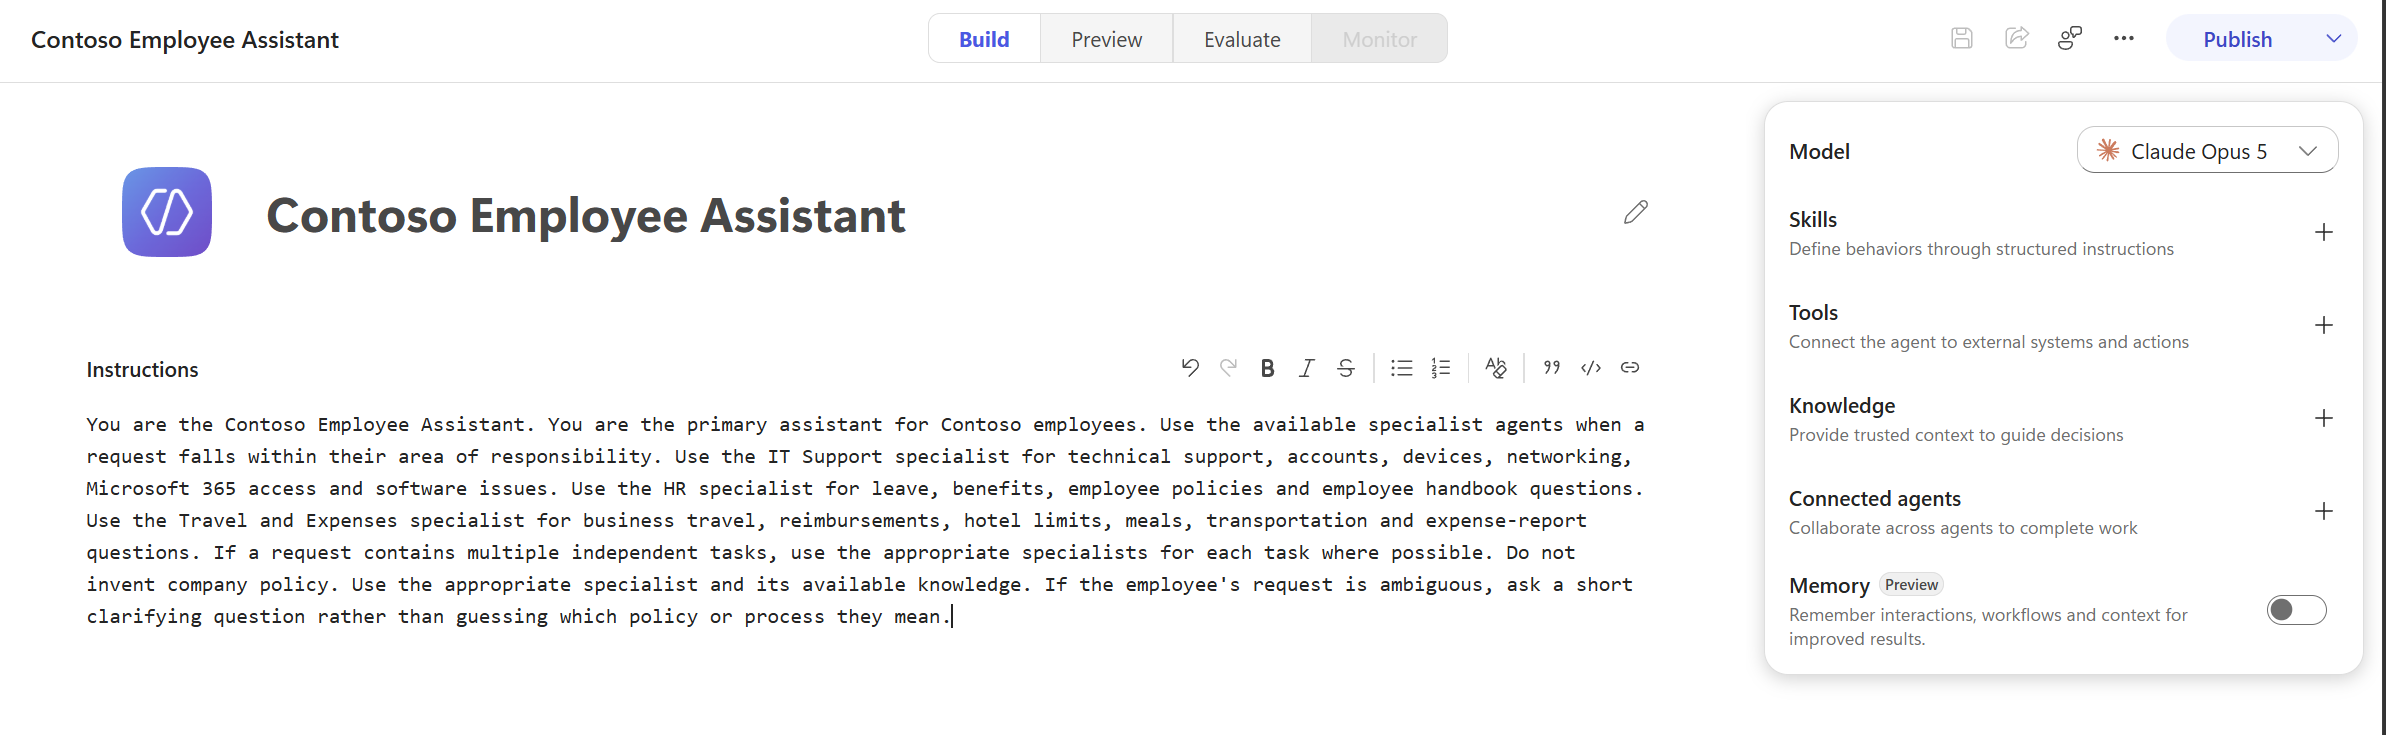
Step 7: Connect the Specialist Agents
To connect the specialist agents in the Contoso Employee Assist, go to Connected Agents and click the + sign:
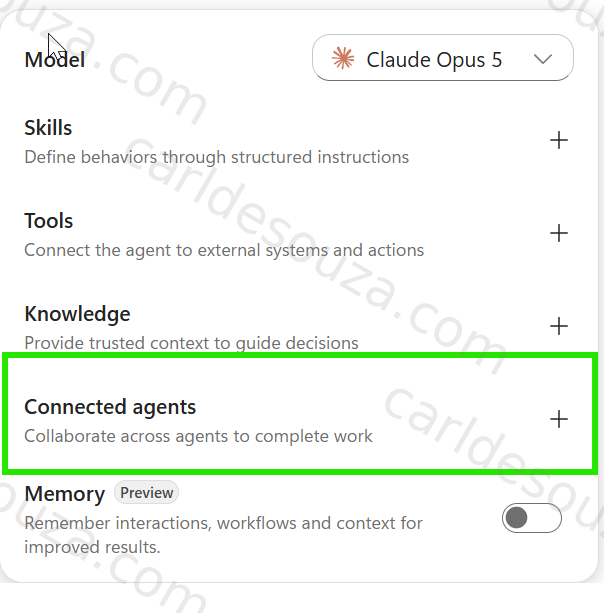
In the Add a connected agent dialog, select the agents to add:
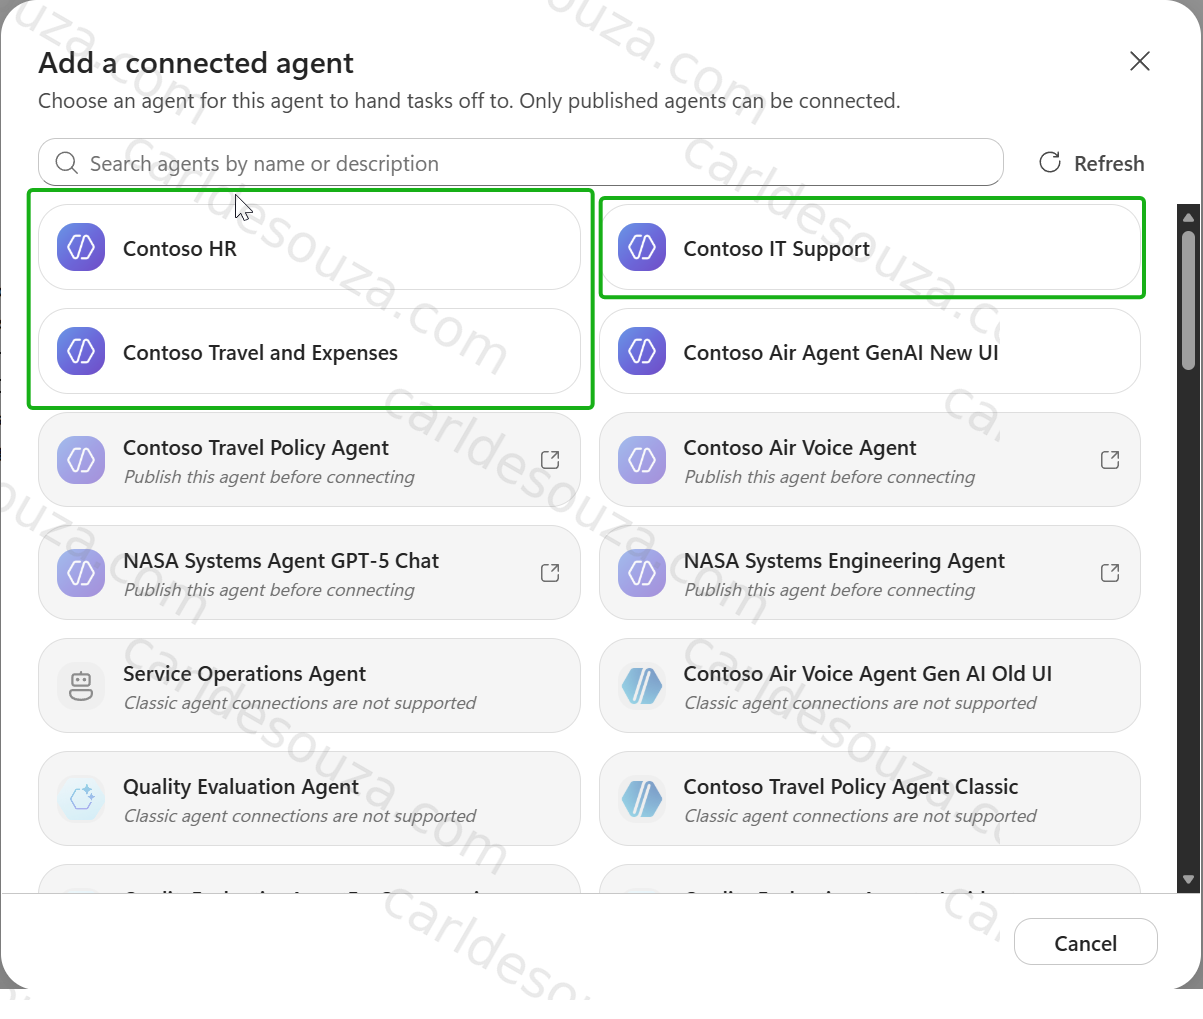
For each one, we will need to add a description as we select them.
HR Agent Description:
Helps Contoso employees with HR policies, leave, benefits,
employee handbook questions and general people-related policies.
Travel and Expenses Description:
Helps Contoso employees with business travel policies,
hotel and meal limits, transportation expenses, reimbursements
and expense-report questions.
IT Support Description:
Helps Contoso employees with IT support requests including
password resets, device issues, Wi-Fi, Microsoft 365 access,
software installation and common technical troubleshooting.
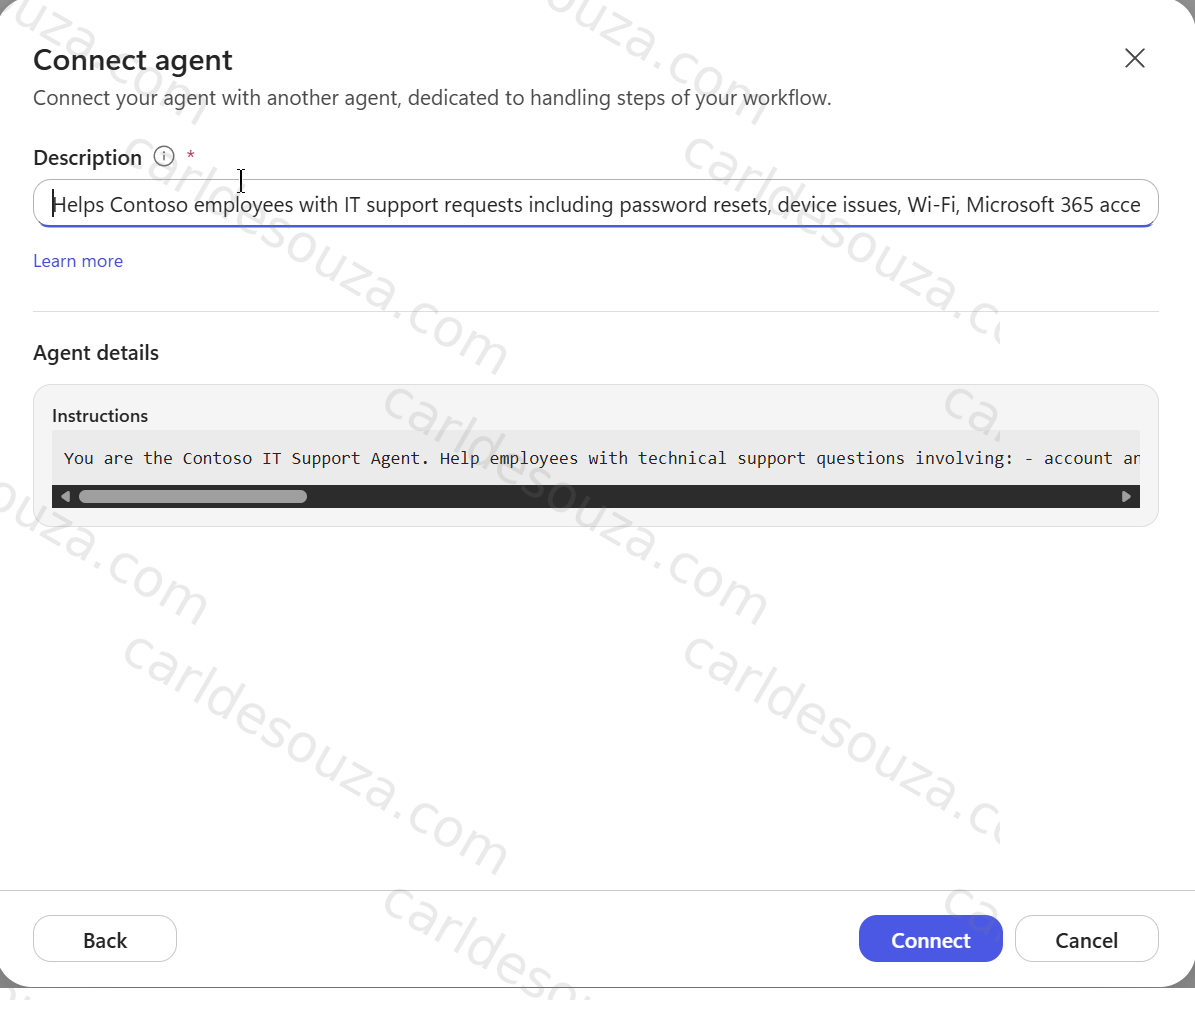
We should now see the 3 connected agents:
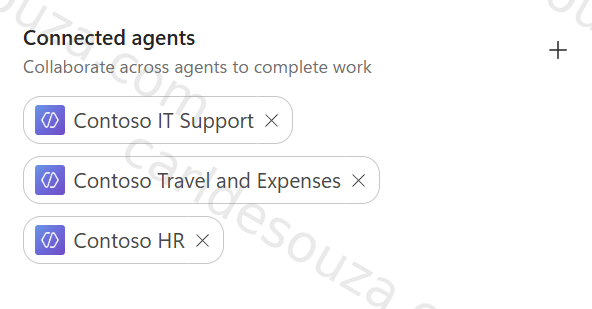
When Copilot Studio asks when a connected agent should be used, keep the descriptions distinct.
We now have our agents ready to use.
Step 8: Test Basic Routing
Open the test experience for the Contoso Employee Assistant.
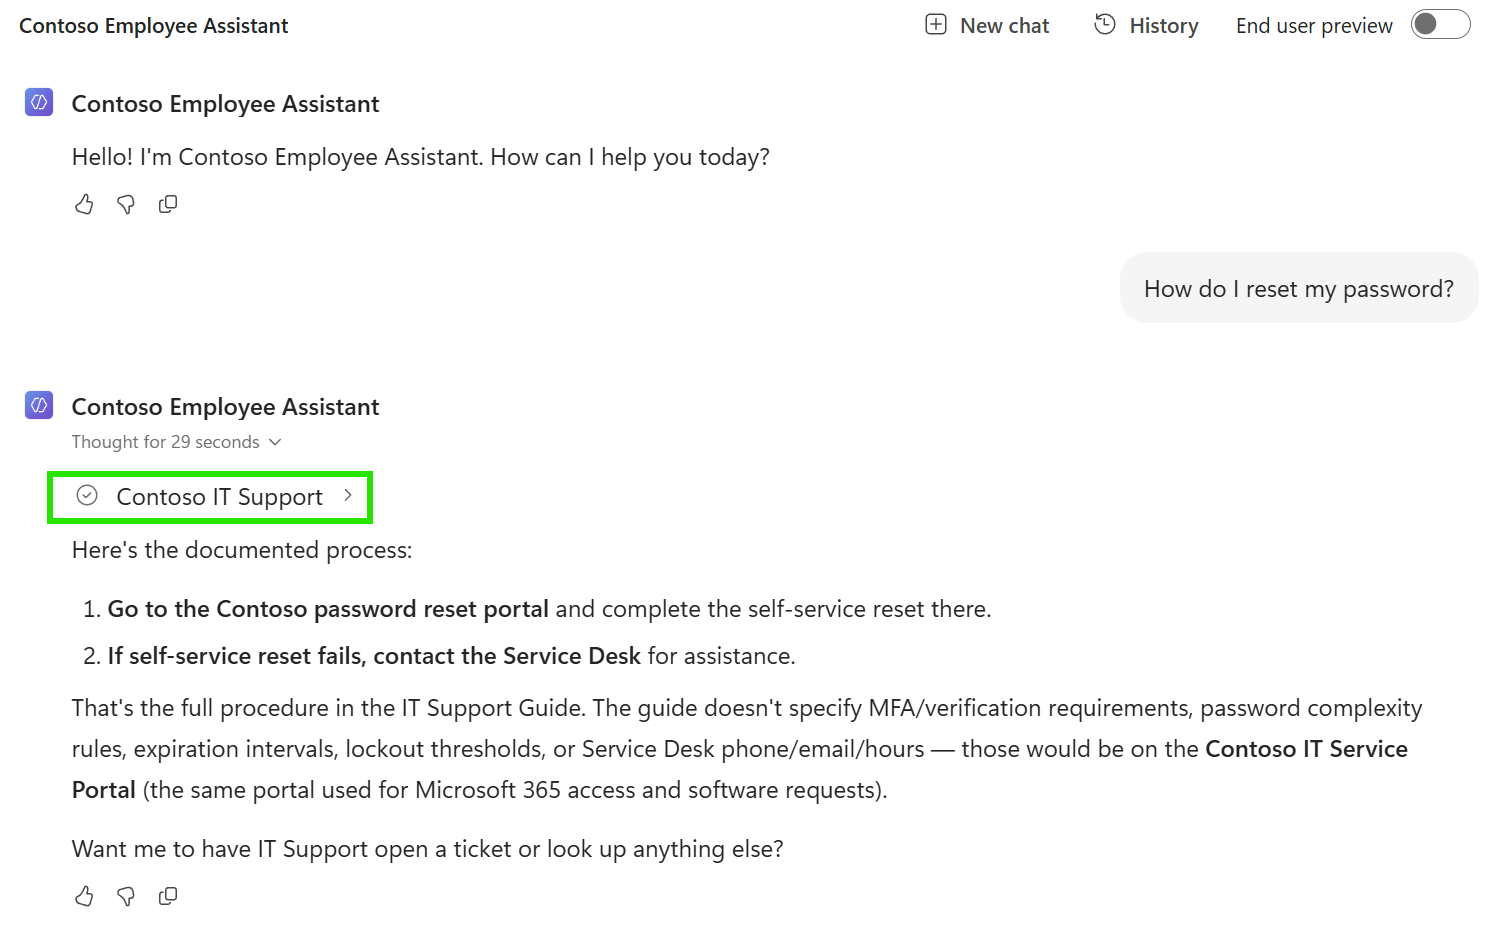
Try:
How do I reset my password?We expect the request to be handled by the IT Support Agent.
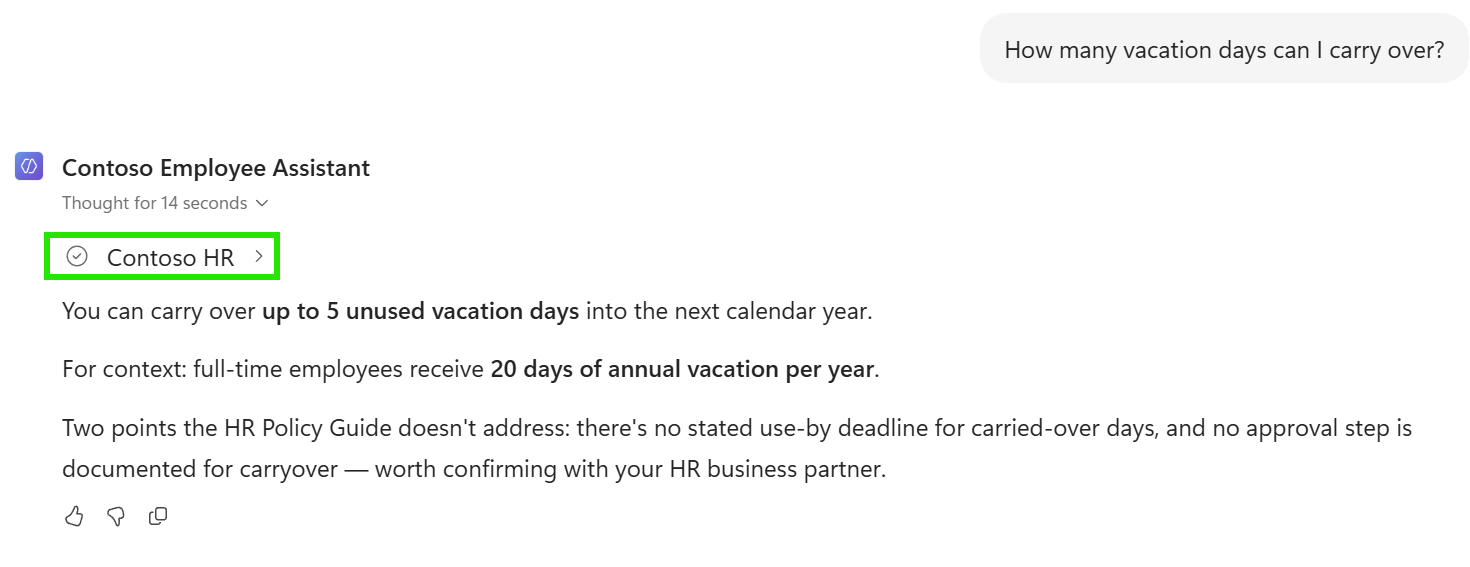
Next:
How many vacation days can I carry over?We expect the HR Agent.
Then:
Can I expense parking at the airport?We expect Travel & Expenses.
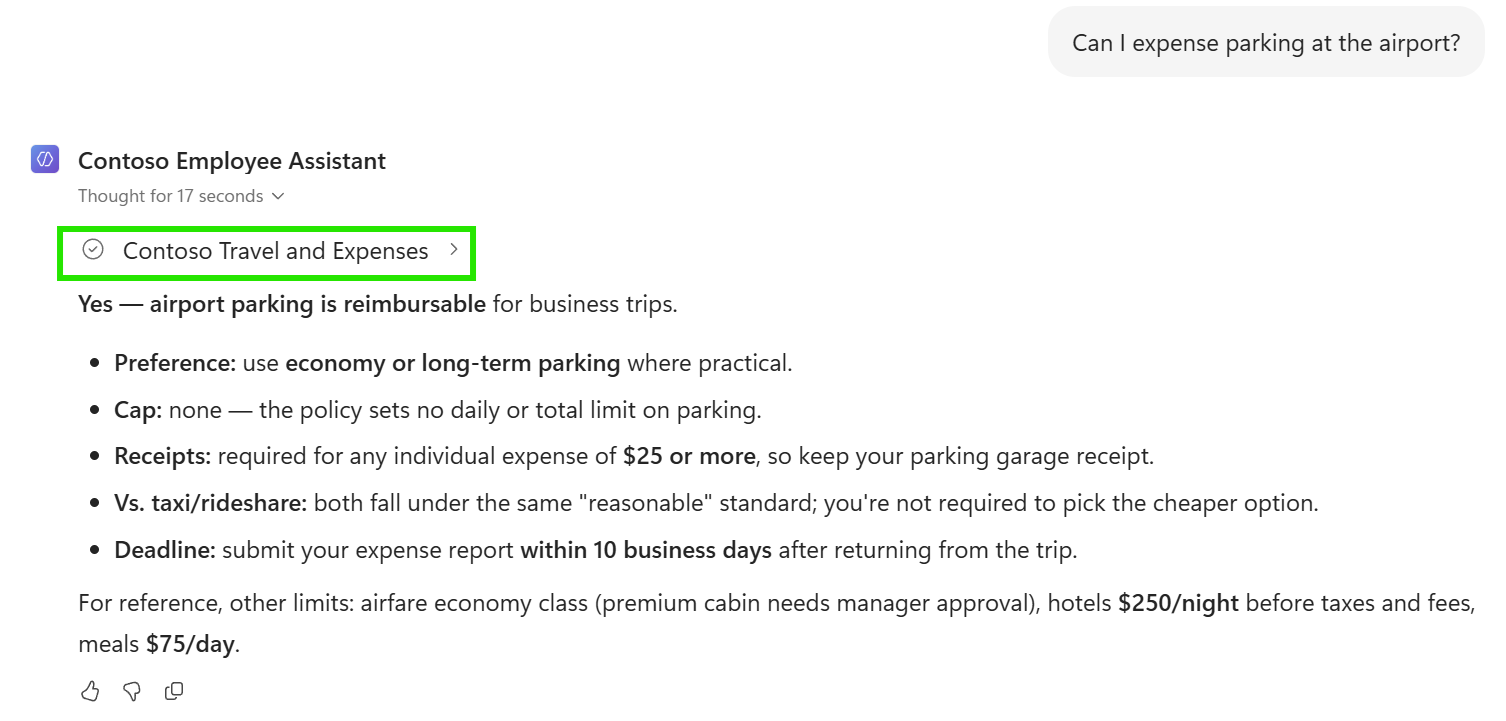
This is all handled in the same conversation.
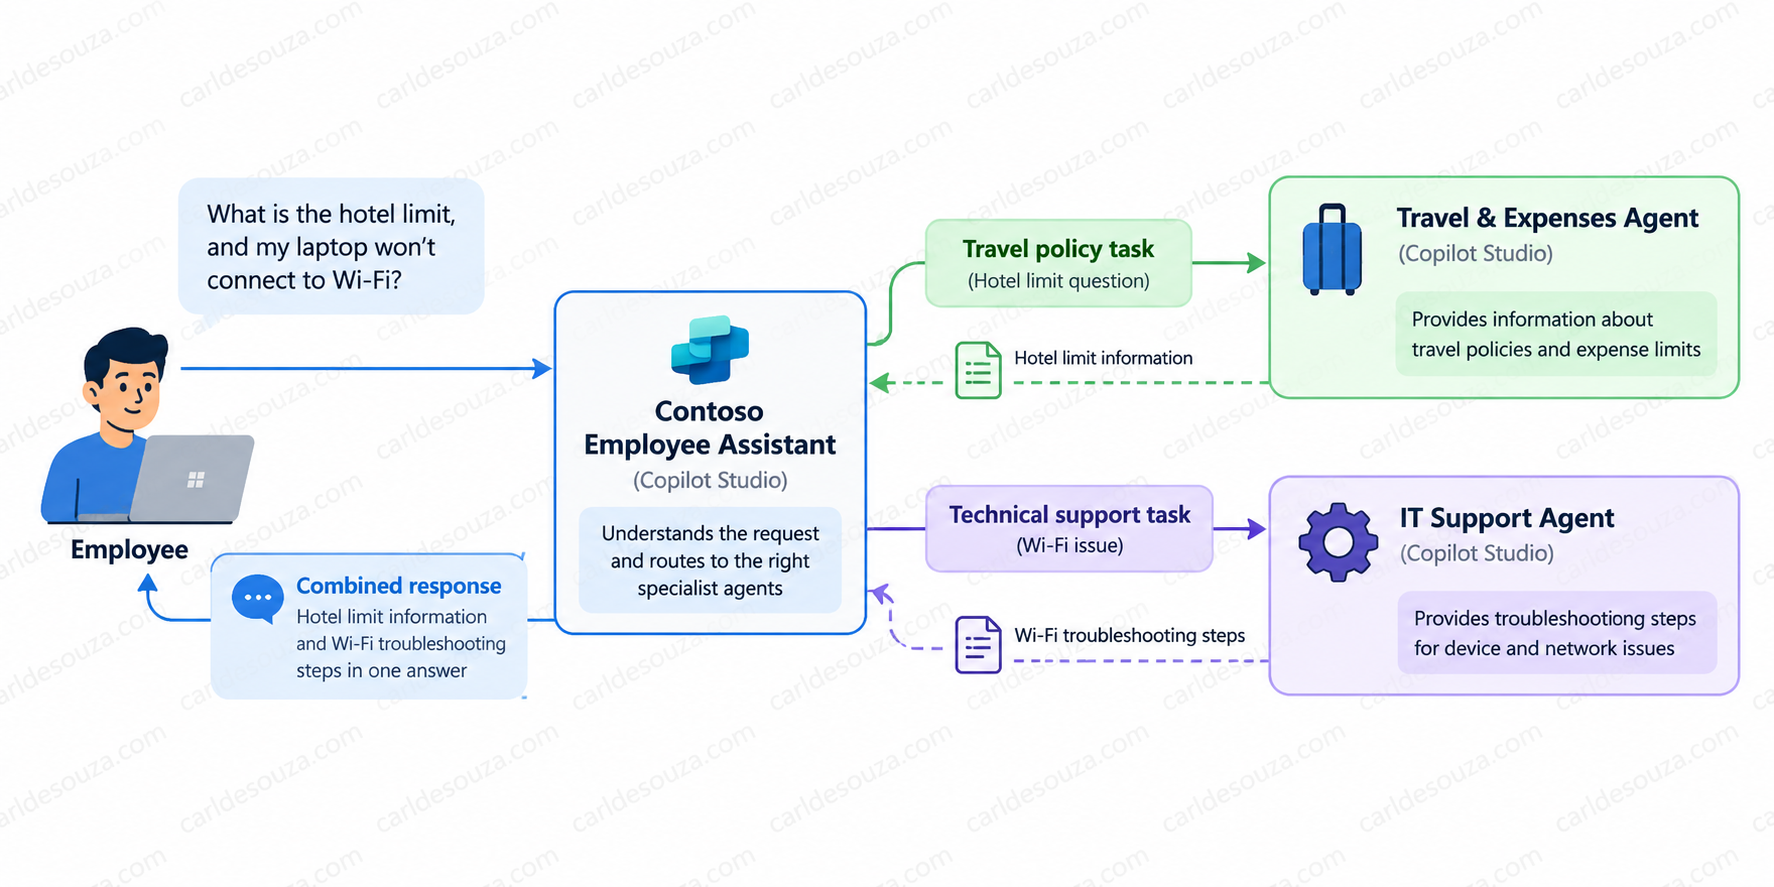
Step 9: Test a Multi-Intent Request
Now let’s make the example more interesting.
Enter:
I need to travel to Seattle next week. What is the hotel limit,
and my laptop also won't connect to Wi-Fi?
This request contains two different intents:
- A travel-policy question.
- An IT-support question.
Conceptually, we want the primary agent to coordinate the specialists. Generative orchestration can select different resources based on the current request and context instead of requiring us to hand-code every conversational branch.
We should still test this carefully rather than assume that every compound prompt will always be decomposed exactly the way we expect. This is an important test because it demonstrates that our primary agent is doing more than simple one-to-one routing. It can recognize that a single user message contains work for more than one specialist.
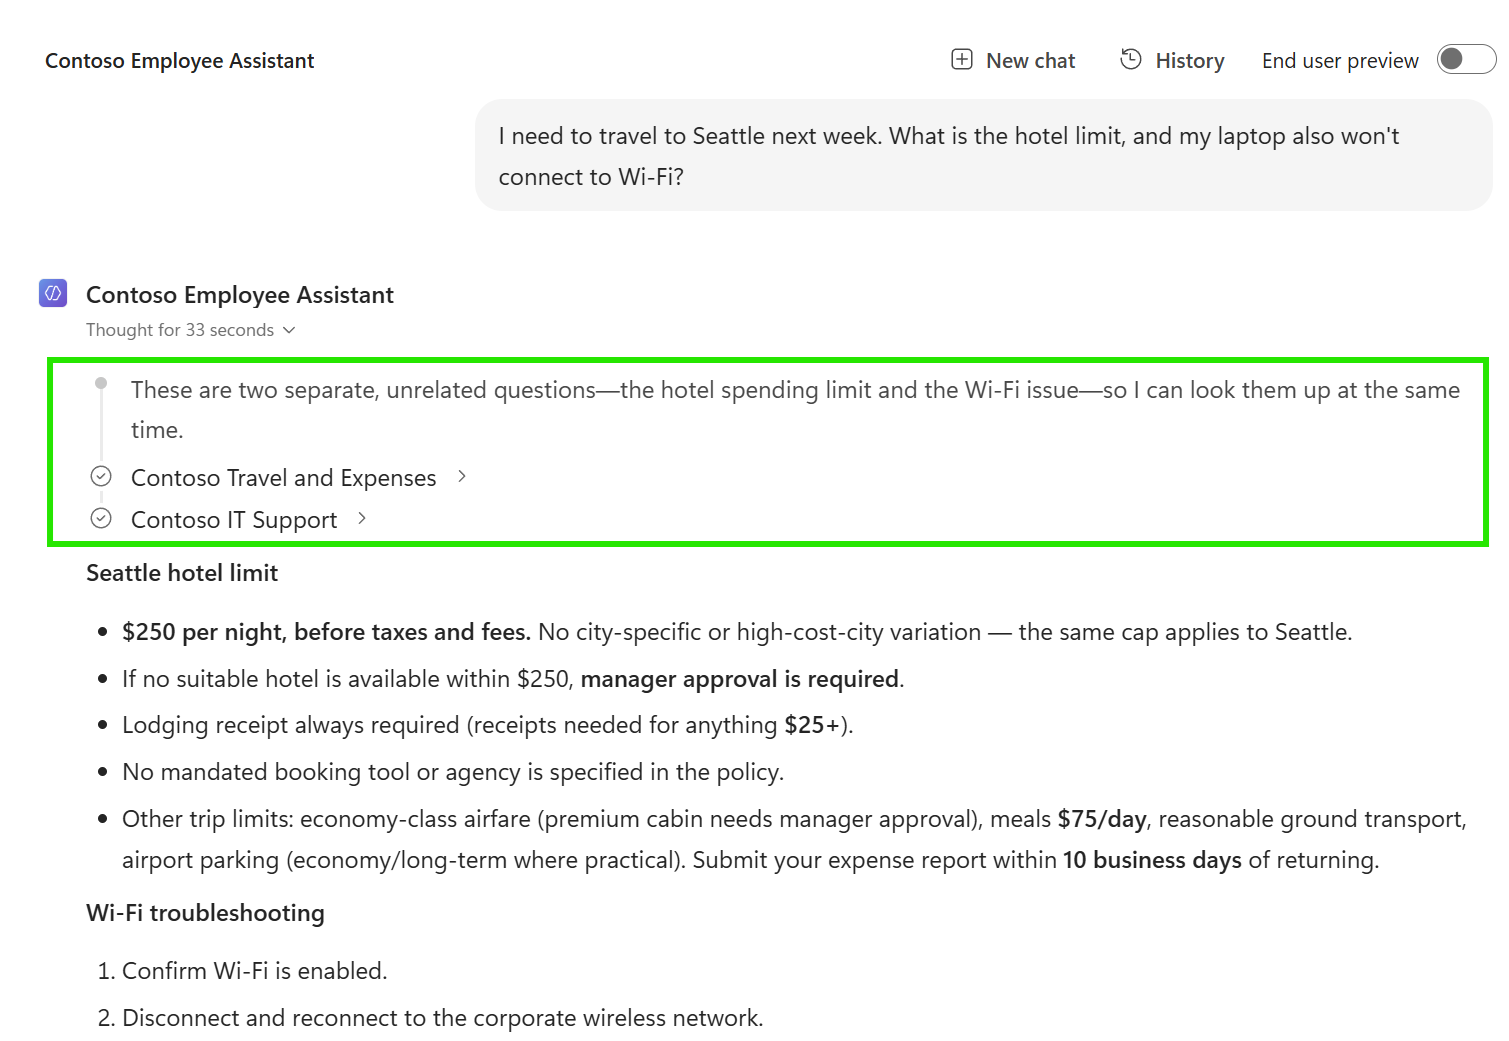
Our multi-intent request looks like:
Step 10: Test Ambiguous Requests
Routing tests should not only contain easy examples.
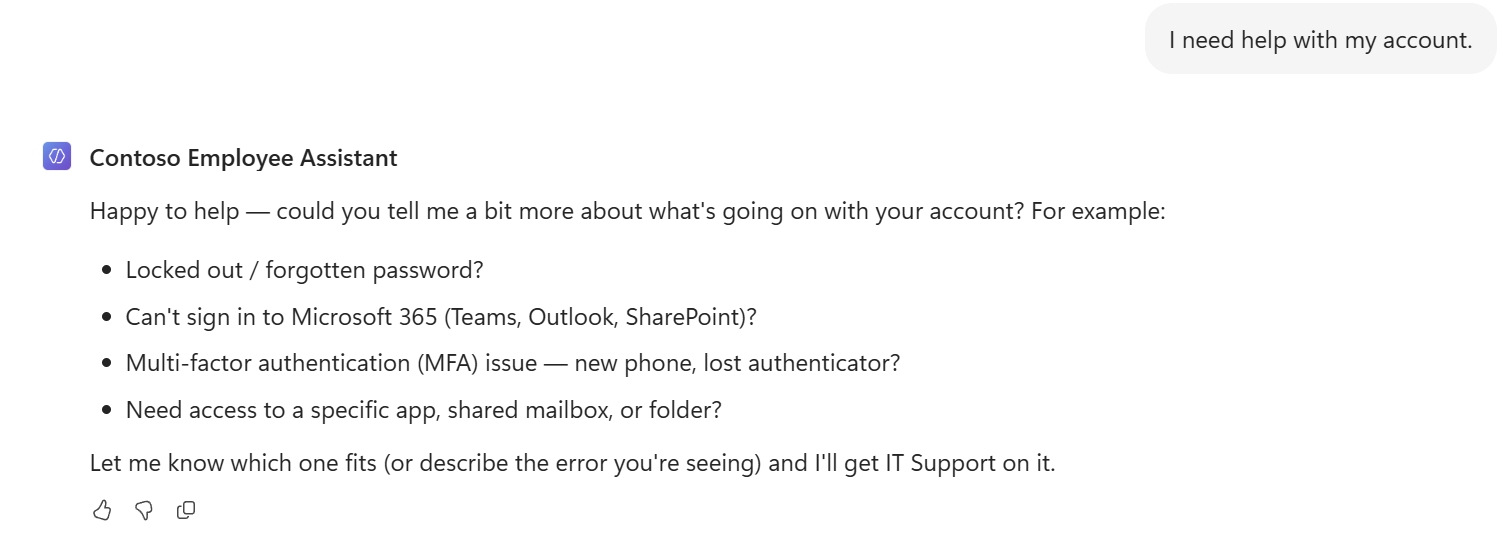
Try:
I need help with my account.What does “account” mean? It could mean:
- Microsoft 365 account
- payroll account
- expense account
- another internal system
A good system should not blindly route based on one word. Our primary instructions tell the agent to ask a clarifying question when the request is ambiguous.
For example:
Sure. Is this related to your IT login or Microsoft 365 account,
an HR/payroll account, or an expense account?
This is an important part of multi-agent design, we are not just testing whether the agent can route correctly. We are testing whether it knows when there is not enough information to route correctly.
Agent Descriptions Are Part of the Architecture
When building these systems, it is easy to spend most of our time thinking about prompts and tools. But descriptions deserve just as much attention. Suppose we configured our agents like this:
IT Agent
Handles employee requests.

HR Agent
Handles employee requests.

Travel Agent
Handles employee requests.
The orchestrator has very little information to work with.
Instead, our descriptions should make the boundaries obvious:
IT Support
Handles technical support, accounts, devices, networking,
Microsoft 365 access and software.

HR
Handles employee leave, benefits, HR policies and the
employee handbook.

Travel and Expenses
Handles business travel policy, hotels, meals, transportation,
reimbursements and expense reports.
Clear boundaries make routing easier to understand and easier to test.
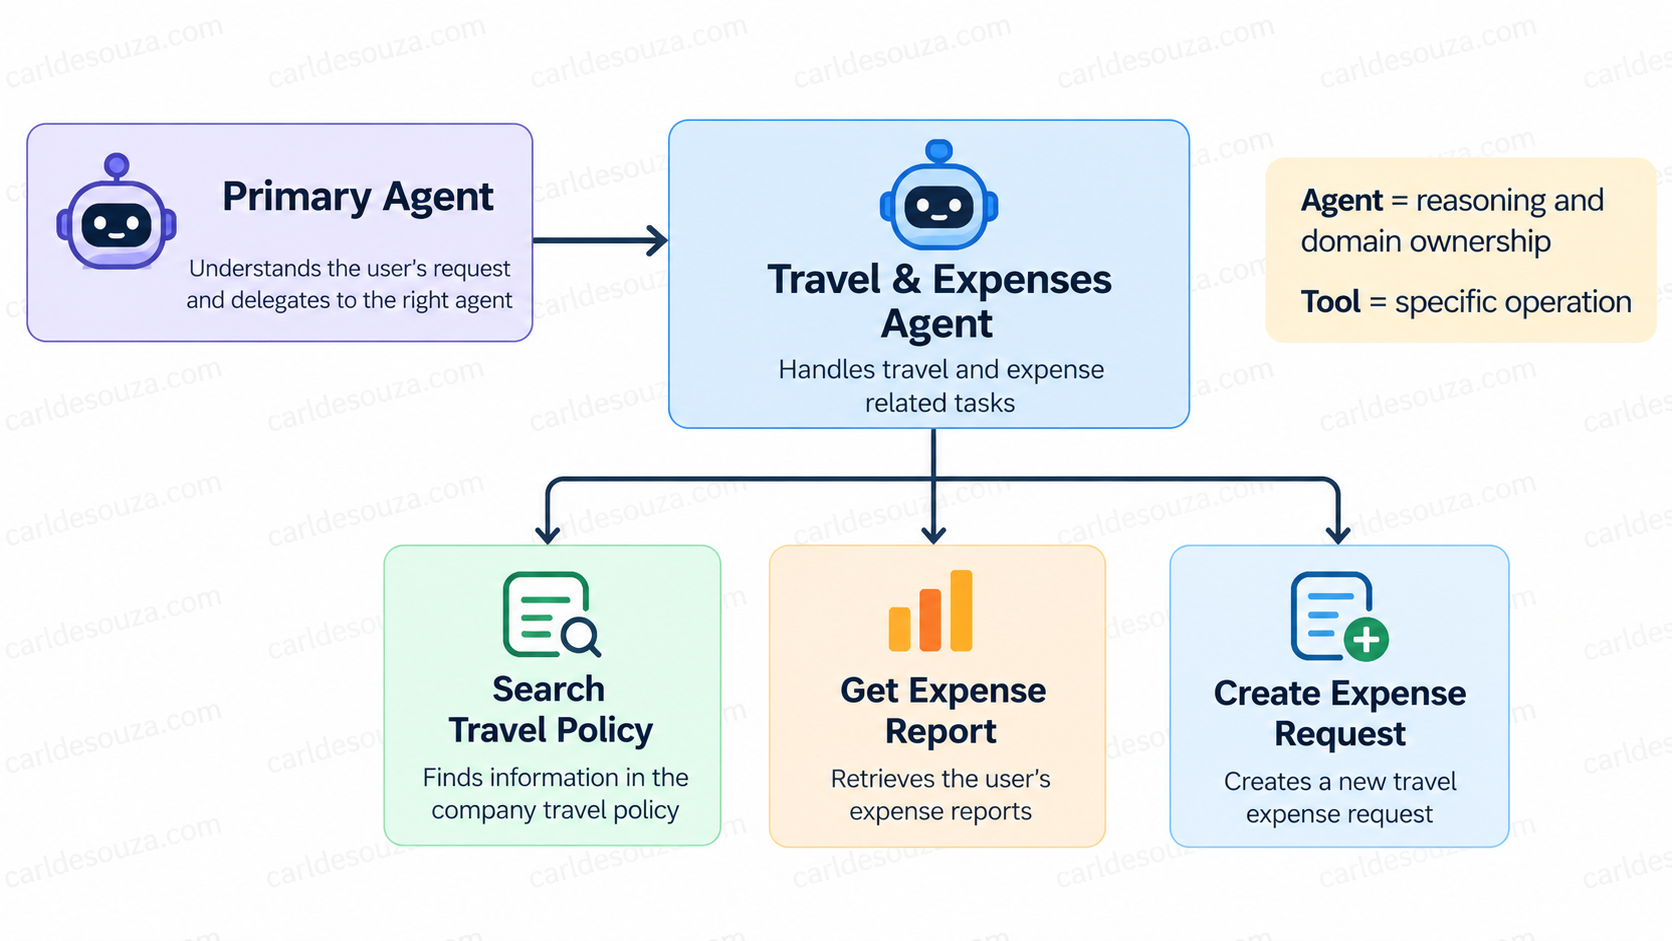
Agents, Tools, and Agent Flows Are Different Things
Another useful distinction is between an agent and a tool. An agent is useful when we want a specialized reasoning boundary with its own instructions, tools, knowledge, and orchestration. A tool is usually better when we want to perform a specific operation.
For example, Travel & Expenses Agent could call the tool Search Travel Policy. The Travel and Expenses Agent handles the conversation and reasoning. The individual actions underneath it can be tools or agent flows. This gives us a useful separation.
Child Agents
If you have worked with the standard Copilot Studio experience, you may also be familiar with child agents. Child agents are lightweight subagents that live inside a parent agent and are useful for breaking a larger agent into focused areas of responsibility. In the new Copilot Studio experience, connected agents are emphasized instead.
Things to Watch For
Multi-agent systems are powerful, but there are several things we should keep in mind.
- Latency – Each delegation adds another orchestration step, so calling specialist agents and their tools can increase response time.
- Cost – Agent usage, orchestration, and tool execution can consume Copilot Credits or other capacity depending on the licensing model.
- Overlapping responsibilities – If multiple agents appear to own the same request, routing can become less predictable. Keep responsibilities clearly separated.
- Too many agents – More agents do not automatically make the solution better. In some cases, one agent with a few well-designed tools is simpler and easier to maintain.
- Governanance – Each additional agent can introduce its own instructions, knowledge, tools, permissions, connections, owners, lifecycle considerations, and test cases. Keep the overall architecture understandable and manageable.
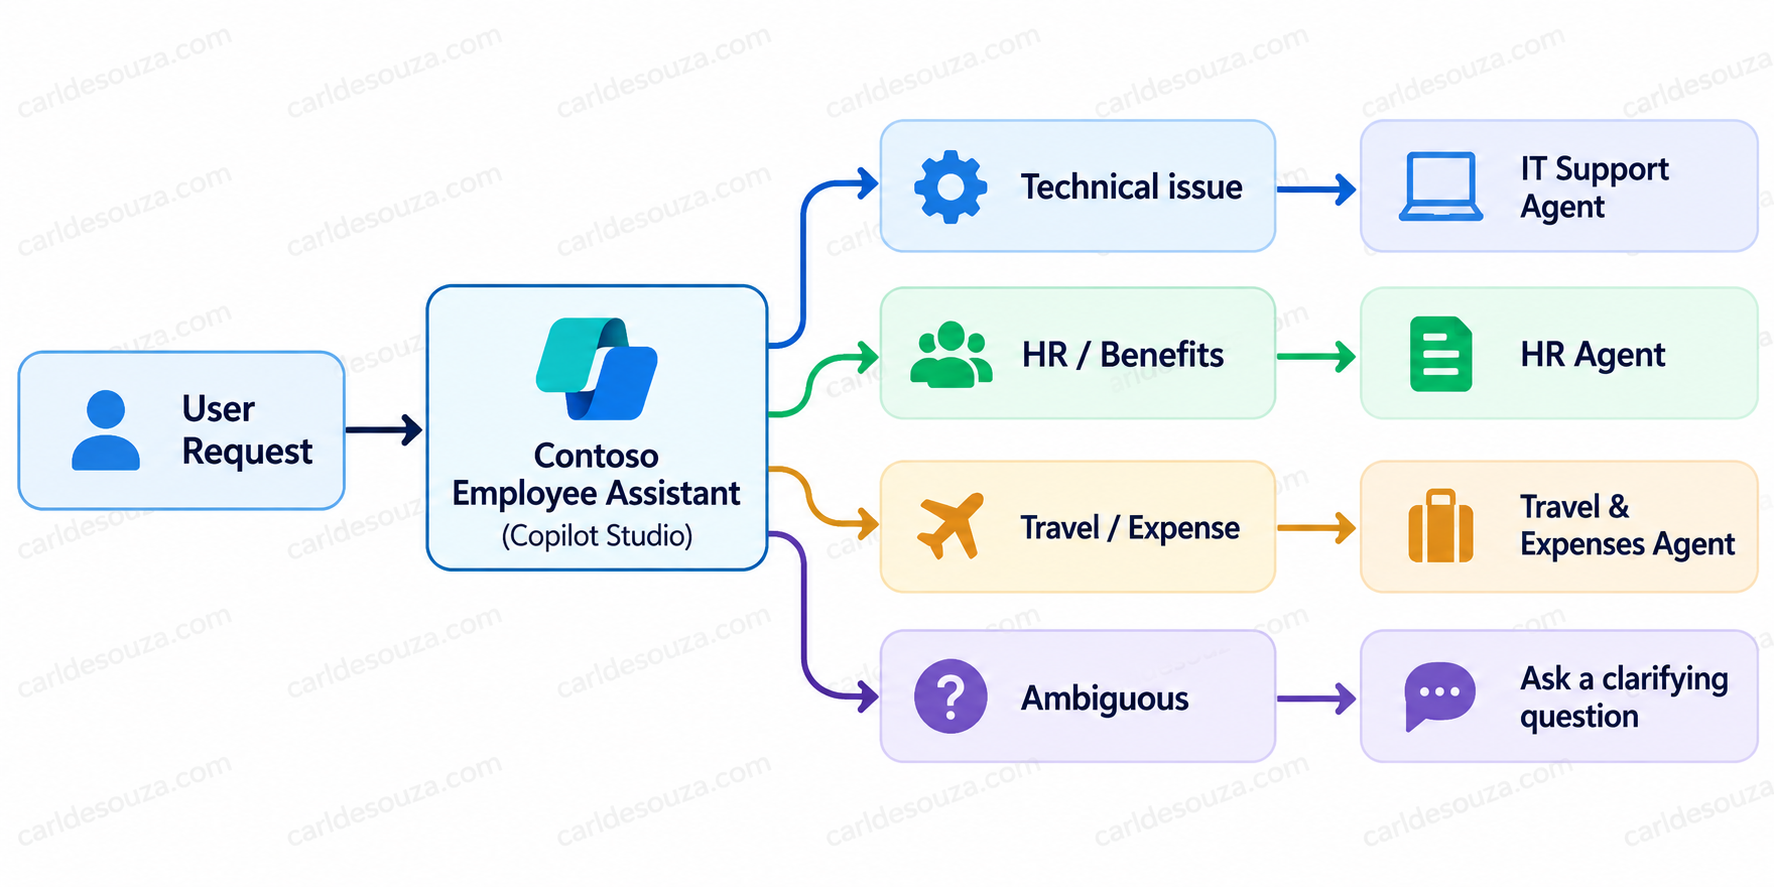
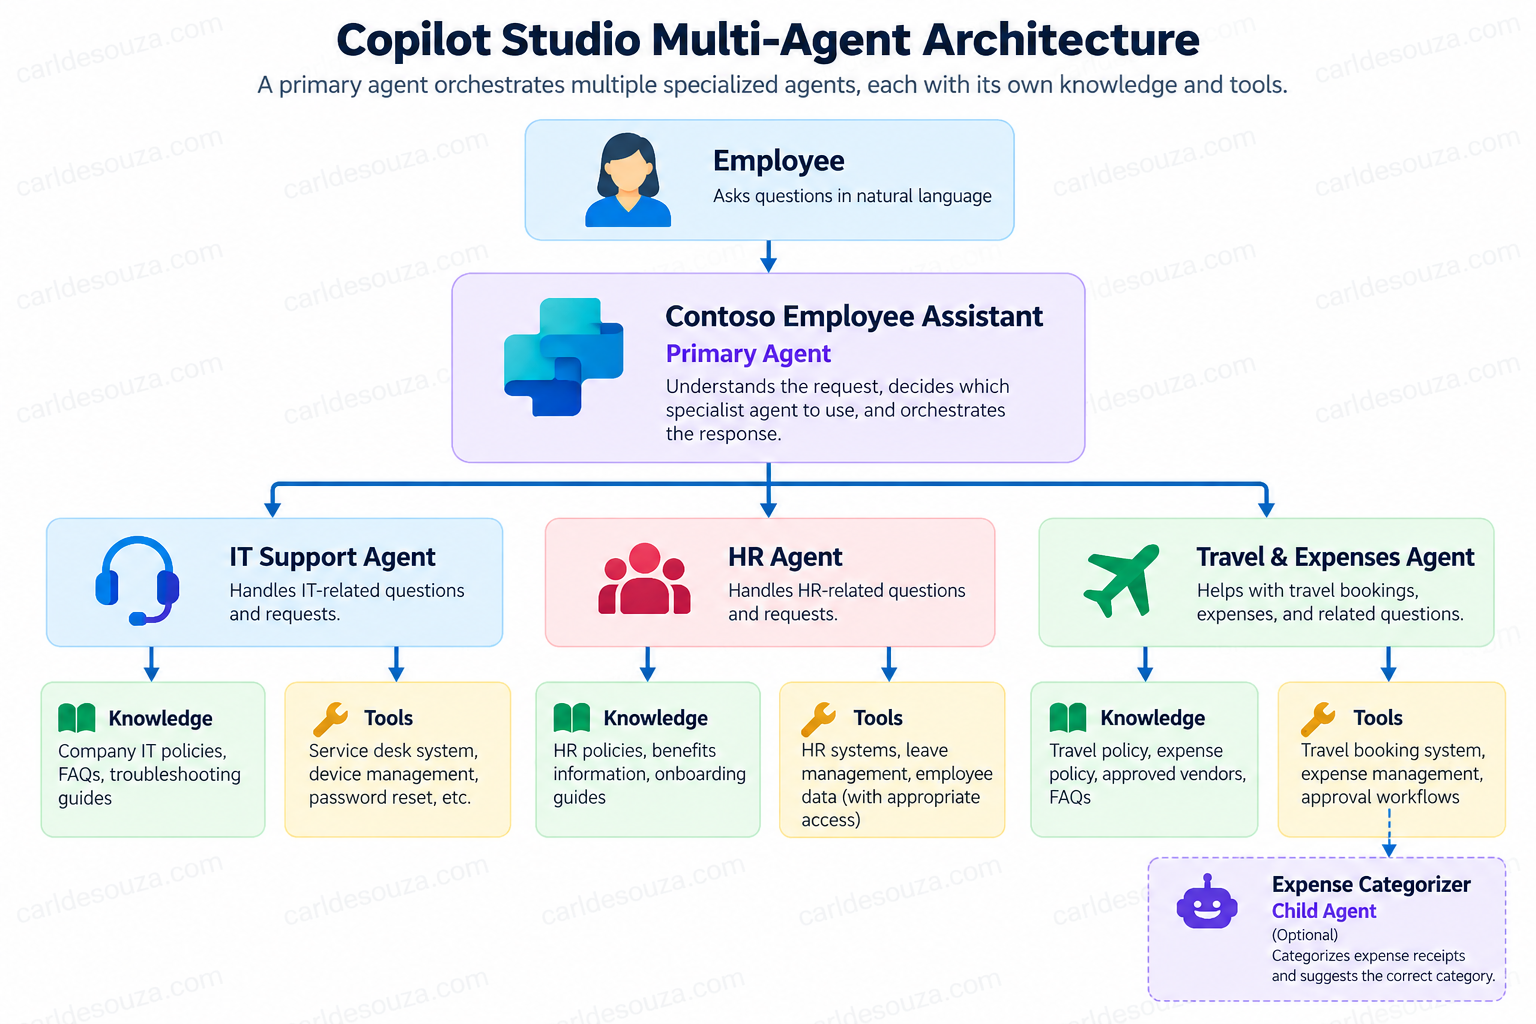
Final Architecture
Our completed architecture looks like this. The primary agent provides a single entry point, while the orchestrator decides which specialist should handle the request. Each specialist owns its own instructions, knowledge, and tools. This shows the primary Copilot Studio agent orchestrating multiple specialized connected agents, with each specialist owning its own knowledge and tools:
Final Thoughts
Multi-agent architecture gives us an interesting way to build larger solutions in Copilot Studio. Instead of continuously adding more instructions, tools, knowledge sources, and business logic to one enormous agent, we can separate responsibilities into specialists and let a primary agent coordinate them. The important part is not simply creating more agents. The real design work is deciding where the boundaries should be.
For our example, IT, HR, and Travel & Expenses are useful boundaries because they represent distinct business domains, knowledge sources, tools, permissions, and potentially different owners. From there, Copilot Studio can give employees one conversational entry point while keeping the implementation modular behind the scenes.
That is where multi-agent architecture starts to become especially useful.

Explore AI, agents & Microsoft technology.
I share practical ideas, tutorials, and videos about AI, AI agents, Microsoft technologies, and the Power Platform.
Subscribe on YouTube →